Creating a custom product page for WooCommerce can be daunting. There are so many elements to consider, and it's hard to know where to start. This article is going to focus on how you can use Visual Composer and WooCommerce to create a beautiful, functional product page!
We'll get to a custom product page in 3 simple steps:
- Creating a product with WooCommerce;
- Adding the product to a page created with Visual Composer;
- Creating a custom "Add To Cart" button.
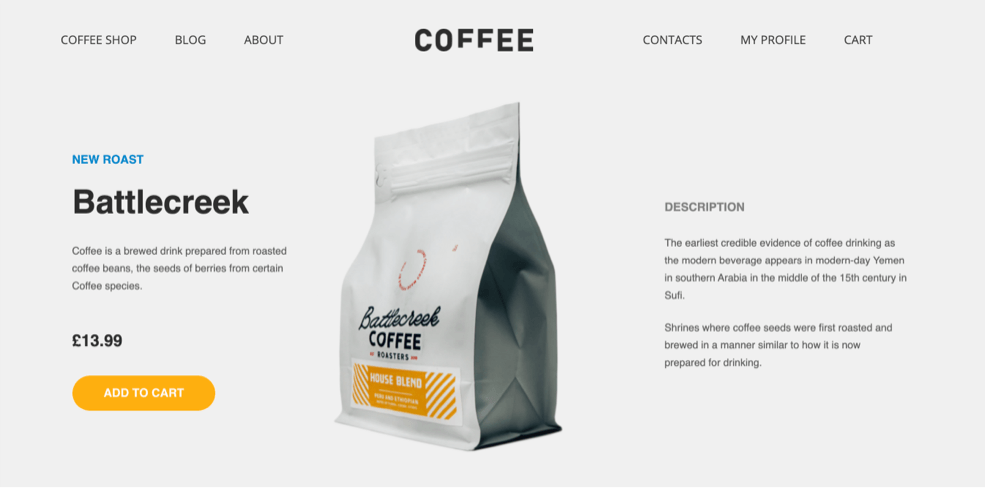
So you have a visual representation of what I'll be talking about, this is an example of what a custom product page can look like.

All the steps will be based on this layout, but everything is 100% customizable.
Creating a product
Creating a product with WooCommerce is as straightforward as it gets. The first step is to have WooCommerce installed and ready. Now log into your WordPress admin panel and follow these steps:
- Locate "Products" on the left side menu;
- Click on "Add New";
- Fill in information about your product and save.

Make sure to mention the title, price, add a description. You can also add a category or anything else your product needs and that will be important to display on the product page.
Adding the product to a page
Now we can move on to the actual product page. This is where you get ultimate design freedom so you can go as crazy or as minimal as you want. The main thing I wanted to show in this step is a handy feature of Visual Composer - Dynamic Content. It allows syncing the WooCommerce products with the page where they're displayed. Meaning, if you add a dynamic price to your page when it's changed in the WooCommerce product (like the one I walked you through in the previous step) it will automatically change on the page too. You can save a ton of time with this technique in the long run.
I'll show you how to add dynamic content with the same price example, but it can be used for the image, the description, the title, and everything else you filled in about the product.
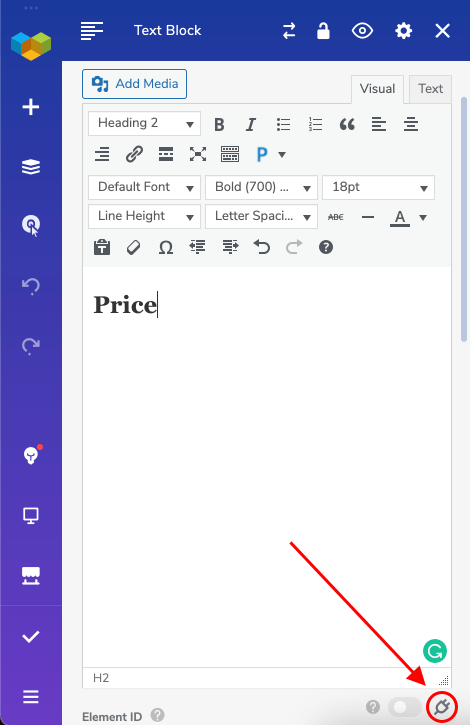
Let's say you've got your layout ready and styled and now there's a placeholder text for the price. I usually just use the Text Block element and write “Price” where I want it to be.
Next, open the Edit Window for the text block element and look for the Dynamic Content icon at the very bottom of the TinyMCE editor.

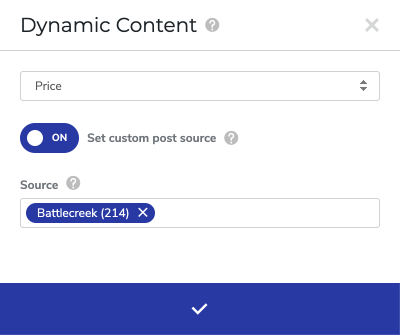
There you have to enable the toggle which allows choosing the source from which information is going to be taken. In our case, you have to find the product. You do that by writing its name or the product ID. You can find it in the “Products” section under the product.
Then just choose the type of content you want to be displayed from the dropdown. You'll find “Price” under the WooCommerce section at the bottom.

Now just save and the information will be all synced up and we can move on to the next step.
Creating a custom "Add To Cart" button
When it comes to a custom product page, you don't want to rely on the default styling of WooCommerce or your theme. So there's always a way to go around it with Visual Composer.
Once you've got your button, it's styled the way you want it to and added to the product page, there a couple of simple steps to take.
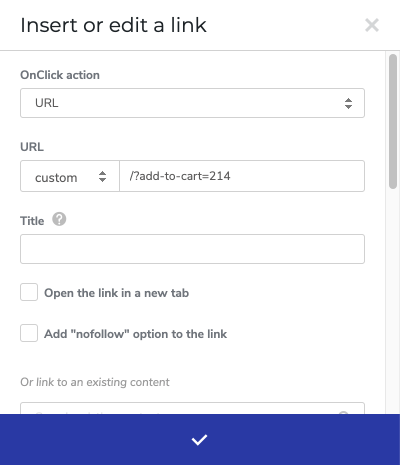
First, you'll have to open the edit window of the button and then open the link selector. There, choose “Custom” from the dropdown. Now enter the ‘Add to Cart’ URL with the appropriate product ID.
The URL should look something like this: /?add-to-cart=1404, but replace the numbers with your product ID.

When that's done your button will add the product to the cart. As simple as that.
Conclusion
Visual Composer and WooCommerce makes the perfect pair for creating custom product pages. You can use our drag-and-drop interface to customize the layout and design of your product pages and all it takes is installing both plugins in order for you to get started.
If there’s anything else about creating content using WooCommerce and Visual Composer that interests you, let us know!

This was helpful, but is there a way in VC to edit the actual WooCommerce product page template, not just create a single product page?
Hi Bryan, if by actual WooCommerce product template, you are referring to the existing WooCommerce product template, then Visual Composer will work within its description area. The areas outside of it are controlled by WooCommerce (and theme, if the theme modifies the product template). Due to this, it will not be possible to edit the entire product template and the Visual Composer usage, in this case, will be restricted to a certain area.
Hi there, I have the same question as Bryan above.
Hi Rory, please see the answer above – I hope this helps!
If we make custom pages for the products, product details, checkout and the store front, how should we handle Woocommerce’s default pages?
Woocommerce looks for default pages for the likes of the store, product and checkout, if we are using our own Visual Studio pages, Woocommerce still expects some default pages so it can function. If we don’t want to use Woocommerce inbuilt templates and instead use our Visual Composer templates, where should we point woocommerce default pages so they don’t interfere?
Hi Allan, your own page templates can be set over the WooCommerce’s default page templates in the WooCommerce settings, under the ‘Advanced’ tab. If they’re set to custom pages, then the custom ones will override the default ones.
Hope this helps!
pardon my ignorance but in woocommerce settings under the advanced tab I’m not seeing any any option for product page … under the page setup heading I see cart page, checkout page, my account page and terms and conditions but nothing for product page
Hi! Great video, thanks!! I’d like to know if there is a way to display a message when someone clicks the “add to cart” button? Also, how did you redirect to the cart as soon as the button is clicked?
Hi Michel, thank you for the comment!
To redirect to the cart, as soon as the button is clicked, go to WooCommerce settings in your WordPress admin dashboard, select the ‘Products’ tab, and click ‘Redirect to the cart page after successful addition’ under ‘Add to cart behavior’ settings. Once applied, a standard message will also be automatically displayed when redirected to the cart page.
Is there a way to make the add to cart button dynamic, where it fills in the product ID? This video is an example of dynamic content but describes the add to cart button with a specific ID.
I don’t understand how you can have a “Products Template” customization option in the Theme Builder Settings, but not be able to pull in WooCommerce product information dynamically…. Please either allow elements that dynamically pull in WooCommerce information or at the VERY least have the URL for standard buttons be able to pull in dynamic content.
Also could we pretty please have the option to include html or text before/after dynamic content for this reason? If I could pull in the post ID dynamically to the button URL with a prefix for the ?add-to-cart portion that would solve a LOT of issues!! (This should be universal to have an element pull dynamic content and have an option for “Before” and “After” content, so if a custom field is a number and we want to add units to it, it’s super easy!)
Thank you!
The dynamic add to cart function is possible within VC. First, add a basic button. Under the button’s Content tab > Link selection, choose Select A URL. On the OnClick action dropdown, choose Dynamic Content. Below that choose Add To Cart.