Anyone who owns a website comes at a time when it is necessary to inform website visitors about one of the following or other such events: new website launch; time left until an upcoming event or a product release; or showing how much up to the end of the sale. Scenarios when a countdown timer is your big helper.
Keep reading and learn more about the cases when to use a countdown timer and what are the ways of how to create a well-engaging countdown timer for your WordPress website.
Before you learn all this, let's find out what the countdown timer really is...
What is a Countdown Timer?
A countdown timer is a motivating feature that you can include on your website to create urgency or inform about an upcoming event. It works just like an animated clock and is most often used as a countdown for sales.
Nowadays, time is one of our most valuable assets and, as we are so accustomed to planning, the urgency factor for website countdown timers is far-reaching. Creating urgency is a proven technique to increase sales and website conversions. So, in order not to miss this uplift, get to know when the countdown timer will be a great help to increase the performance of your happening.
When to Use a Countdown Timer?
Scenarios, when to use the countdown timer, are different. Some are more informative, others focus on sales. Whatever the motive, reflecting on how much time left for something is engaging. Below are the most common cases when the countdown timer will benefit your website.
Coming Soon Page
If you are in the process of making your WordPress website, it is valuable to tell others about it. A well-designed Coming Soon Page is like a first dating, if the impression is good, people will want to return to your page to see the outcome.
Maintenance Page
Almost any website owner comes to the moment when their cherished page has to be tuned up. These can be larger design updates or changes to page layout. The message 'We are back soon', supplemented with Countdown Timer, will send a positive signal to your website visitors that you will soon be back online.
Upcoming Event
It can be a long waited tour that allows pre-order tickets. The upcoming events need to be heard. Releasing a new e-book? Inform your followers how long until it's available for download. Your company's anniversary is coming soon? Let your clients know about it by displaying a countdown timer within your site.
Sale or Promotion
The most common cause to drive urgency to the sales. Be it site-wide or dedicated to specific products, the countdown timer is a real booster. Many people act spontaneously, image someone's on your site navigating through and thinking, do I needs this or not. The urgency will help him/her decide, many times in favor of you.
Above are some of the most common cases when using a Countdown Timer. It is time to learn how to make one.
How to Create a Countdown Timer in WordPress?
There are quite a number of countdown tools you can adjust for your website, however, the most popular way to add a countdown timer to your WordPress site is using a plugin. Or if you are a Visual Composer subscriber, you can take advantage of the Countdown Timer element.
This way it is much easier and gives you breathing space from coding. If the code is your usual thing, then you may also use countdown timer scripts created by WordPress developers. Yet, dealing with the coding might be complex, so why not the easy way out?
They say that nothing comes easy but adding a countdown timer to your website is exactly that - easy. Let me show you two different approaches of how you can create and then add a countdown timer for your WordPress site:
- WordPress plugins;
- Visual Composer Countdown element.
How to Create a Countdown Timer Using a WordPress Plugin?
The WordPress repository contains many different countdown timer plugins. Almost all of them are available for free with a chance to upgrade for more features. For my example, I will be using a well-rated T(-) Countdown plugin. This plugin allows you to add HTML5 countdown timers to your website using either shortcodes or widgets.
Before jumping in, you need to install and activate the needed plugin from the WordPress repository. To do so, from your admin, navigate to Plugins > Add New, and search for the desired plugin, for example, T(-) Countdown, click Install > Activate.
Add and Configure Your Countdown Timer via Widget
T(-) Countdown plugin offers two ways to add a countdown timer to WordPress site: a widget and via a shortcode. I recommend choosing the widget option because it is more user-friendly and easier to understand; the shortcodes in the T(-) Countdown plugin are included in the documentation and are somewhat complicated in nature.
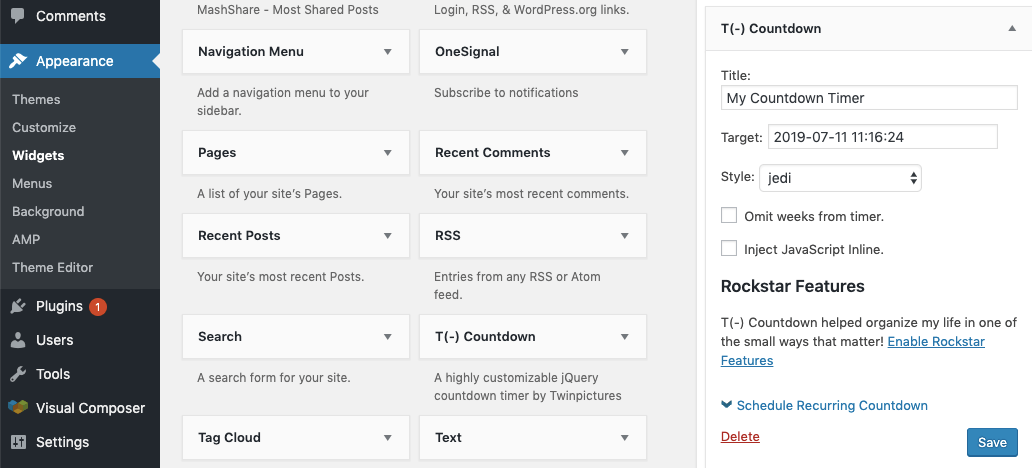
I assume you have activated the plugin. Now you will find a new element (the new plugin) under Appearance > Widgets, right inside the WordPress admin.

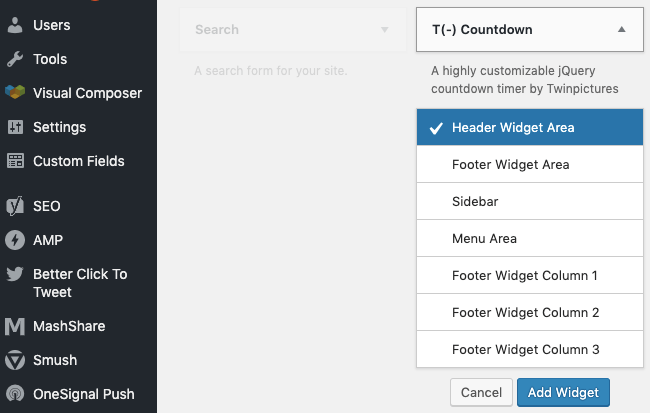
Now choose where to place your countdown timer on your page by selecting the options available from the drop-down menu or simply drag and drop the free countdown widget to your desired place.
Once done, start configuring the timer by choosing a date, time and giving the countdown timer a name. Additionally, you can choose from a list of twelve default timer styles for your new element.

How to Create a Countdown Timer In Visual Composer?
Visual Composer Website Builder for WordPress provides all the features you need to help anyone, a beginner or an expert, build their website. One of the features is the Countdown Timer element in the Visual Composer Hub.
To add and manage such, you will need to activate a Visual Composer Premium license that will give you unlimited access to over 500 assets: features, elements, templates, stock images, and addons.
Step 1: Manage Your WordPress Page Using Visual Composer
First, open an existing or a new page/post with the Visual Composer Website Builder and choose either a given or theme default page layout; or go with a ready-made template, whatever suits your current project.
Step 2: Download a 'Countdown Timer' element from the Visual Composer Hub
Now you will want to navigate to the Visual Composer Hub - a library of elements, templates, and extensions, and in the search bar type 'Countdown Timer'.

Once found, click on the element and download it to your library (this element is available for Visual Composer Premium users). Now, choose where you would like to insert the Countdown Timer on your page, and click on the plus (+) sign to add the element. The General setting menu will open with the customization and design options.
Step 3: Customize and Manage the Countdown Timer
Now it is time to customize and add some colors to your Countdown Timer. Below is the default timer which just aches to be styled by you. The beauty is that as soon as you change something in the settings, you will see an immediate change within the timer.
Let's customize this Countdown Timer together, let's start by specifying General settings at the beginning:
Count til: My Countdown Timer will go until June 30th, 2021, 12:00 AM;
Shape: From seven style options, I choose Circle;
Background color: The color palette offers all available colors we know, I go with Light Blue;
Text space/Gap: Let's lave it default 10.
Let's continue with the next setting block, Number Font Family modify:
Font family: From 900 different fonts I choose the Montserrat font;
Font style: Bold (700) Regular; you can also go with an Italic if prefer;
Font size: 50
Next is to apply design via Design Options setting block:
Background color and image: I am leaving Default; the color palette is grand;
Animate: Flash, it will give extra attention; there are heaps of effects to choose from.
This is what I've got so far…
You can play around with the design options, add more colors, change shapes, and adapt the calendar to specific needs. It takes no time to create a totally new look to the Countdown Timer, like in a sample below, it took 2 minutes to customize the previous timer to this one:
Summary
Using a Countdown Timer is not a new approach. Businesses, bloggers, and store owners use countdown timers in order to encourage their audiences for better investigation of the offers and complete browsing sessions with the purchases, or leads.
The online countdown timers can be easily added to your site using different methods. The two most popular ones were discussed in this article. Your choice can be an appropriate plugin or a user-friendly Visual Composer element. Whatever you choose, the process of creating and managing the Countdown Timer it is relatively simple.

this is an awesome plugin. I really use for a long time.
Thanks for the nice words!
its great tool as posted in my page i am greatfuly to you
Hi, Nicholas, thanks for the nice words – we appreciate that.
how can we change text DAYS HOUR ΜΙΝ in another language
There is this toggle in element – Customize Titles.
After enabling the toggle, section below appears and you can write titles in whatever language you want.
The problem is that it will always stay on that language and will not change.