WordPress Widgets add features and functions to your website. They are small blocks of content that allow you to supplement your website with additions such as a menu, calendar, social media feed, photo gallery and many more. The beauty is that you don't need to know the code to complement your website with eye-catching elements. Free WordPress Widgets are designed to place them on your website with easy drag and drop movement.
Continue reading and learn how to add Widget to your WordPress site. Additionally, find out more about Widget Areas and an alternative way to work with Widgets from advanced frontend-editor.
WordPress Widget Areas Explained
Widgets Areas are specially encoded places in your WordPress theme that let you insert the desired function into one of them using a Widget. To make it easier to understand what is a place for Widgets, here is a quick insight into the structure of a WordPress theme.
WordPress Theme Components
WordPress theme consists of different types of content. Primary pages and blogs are followed by custom content, which is usually customized by the theme's author. Each theme is usually dedicated to a specific category. For example, the content of a theme can be customized to the restaurant's website, providing content fields such as menu, order form, etc. By adding e-commerce, the theme allows content for an online shop.
All these content types have main content spaces - the areas you can place your unique content. For example, a place where you write a blog post serves as the main body text. Product description, pricing, or any other element of an e-store is the main content of the theme that you can add your own data. The same goes for content that classed as a Widget.

Additionally, WordPress themes contain several standard elements that are by default. It can be a header that consists of the name of your website, a logo area, footer, navigation menu and other attributes. Usually, the positioning of these elements cannot be changed unless the theme builder comes with help.
When producing a WordPress theme, the author usually tries to include all the important elements in it. But no matter how good the theme is, it is impossible to apply it to everyone's needs. Someone will want to display social icons; another will want to include a blog archive or an image gallery with top products in the sidebar. This is where Widgets and Widget Areas come in.
Let's start with finding Widgets and continue with an example where I will show how easy it is to work with Widgets.
How to Add a WordPress Widget?
You can find Widgets and Widget Areas in the WordPress dashboard by going to the Appearance > Widgets section.
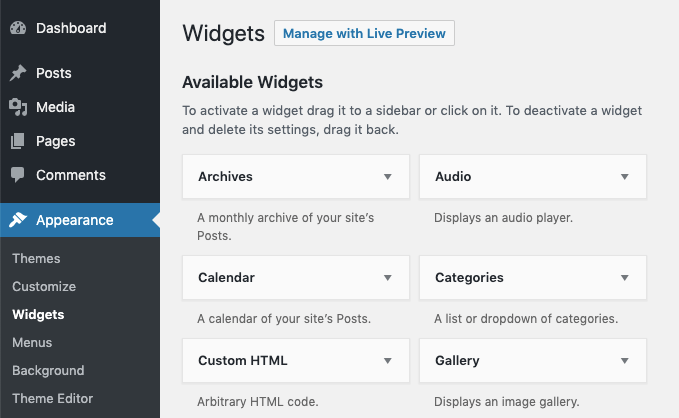
As you start with WordPress, you get a basic list of Widgets. Depending on the theme you use, you may have access to Widgets such as Archives, Custom HTML, Image, Recent Posts, Recent Comments, Navigation Menu, etc.
To add Widgets to one of the available Widget Areas, simply go to the element and drag it to the right side area. To give you a better idea, here's an example of how with some maneuver, I added extra features to my simple blog site.
In this example, I chose Starter Theme, which offers Widget Areas for Sidebar and Menu. At first, they are empty spaces, but free to supplement with free Widgets.
This is how the Widget Area looks from the admin when I go to Appearance > Widgets.

And this is how the blog page looks for the visitors.

As the theme's design and settings provide a sidebar field so you can include more information on the blog, why not make it more interesting to the readers. To do so, you simply go back to the WordPress admin and under Appearance > Widgets customize the Widget Area.
As an example, I want my blog sidebar to have a search field, little information about me, a picture gallery and video with my favorite travel music. To add that, we need to find and drag all the desired elements to the Widget Area, add the necessary information to each of the Widgets, and click Save.
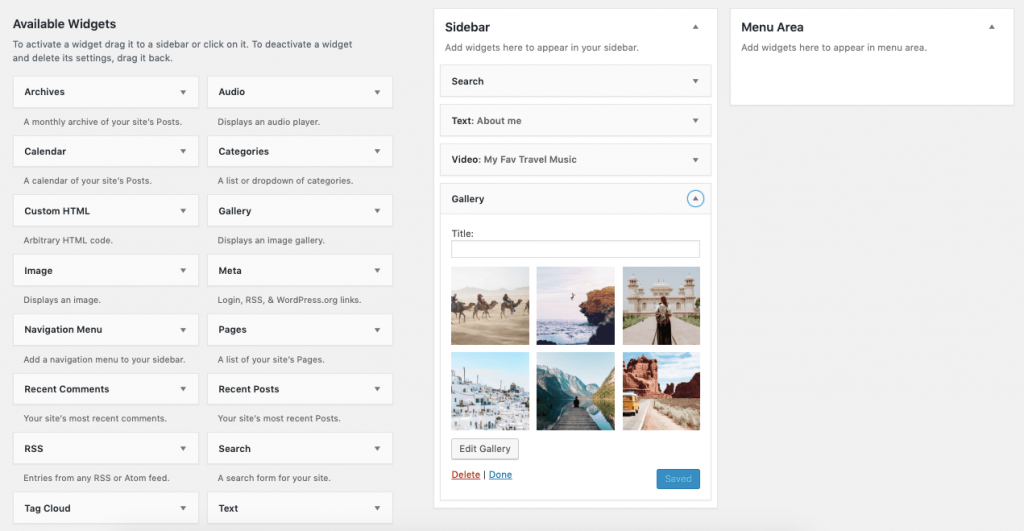
At the top, you see the admin section of my blog where I have placed four Widgets in the Sidebar Widget Area. I've written a title, description, and placed images for each Widget. All this took me no more than five minutes, as a result of which my blog site now looks like this:

This is an easy way for you to enrich your site with information that will give your site visitors more opportunities to know about you, about your products or your business. A sidebar is a great place for related and informational content. Although one of the most popular Widget Areas, the sidebar is not the only place where Widgets can be deployed.
The Widget Area can also be in the header, footer, or below every blog article, for example, to put a widget that tells about an author who wrote a specific article, usually names “Author”. Basically, the Widget can be placed all over your homepage if the theme you are using has included the relevant Widget Area in its code foundation.
By default, WordPress offers fifteen different Widgets. To give you an idea of what Widgets are available to you right away, here's a list.
Default Free WordPress Widgets
- Archives – monthly archive of your site’s posts;
- Audio – displays an audio player;
- Calendar – schedule of your posts;
- Categories – list or dropdown of all categories;
- Custom Menu – create a custom menu;
- Image – display an image;
- Meta – display login, RSS, and WordPress.org links;
- Pages – list of all pages;
- Recent Comments – most recent comments;
- Recent Posts – most recent posts;
- RSS – entries from any RSS or Atom feed;
- Search – displays a simple search form;
- Tag Cloud – a group of the most used tags;
- Text – add text, images, videos or any HTML code;
- Video – displays a video from the media library or YouTube, Vimeo, or another provider.
If you want more Widgets then you have to look for a WordPress plugin that offers customizable Widgets. The second option is from the beginning, choose a theme that has all the Widget Areas you need already encoded. And the Widgets themselves. This will make it easier for you to prepare your website and ensure that you can make a site that you originally planned.
Now, let's look at the most popular and useful WordPress Widgets, which are complementary to countless WordPress websites.
Most Popular and Useful WordPress Widgets
There are heaps of WordPress plugins that offer free Widgets to be placed into your Widget Areas. All you need to do is stick to the website layout, design and functionality plan and decide which Widgets will be added to your WordPress toolkit.
Before going through the extensive Widgets list, it is important to understand that Widgets are hidden under Plugins. To add a new Widget other than the default WordPress or Widgets included in your theme, you will first need to download and activate the plugin that offers your needed Widgets.
Here is a good example. Let's go along with the Widget adding process. I will add my social media account to the travel blog I used as a sample before.
Sample: Adding a Social Media Icons Widget
Linking your social media account with your WordPress site extends your business. Your website visitors will be glad to know you have an inspiring Instagram account, and Facebook users will find it interesting to research your projects via your Facebook page.
Here are a just few of free Social Media plugins that allow Widgets:
- Social Media Share Buttons & Social Sharing Icons
- Social Media Widget by Acurax
- Floating Social Media Icons
In my sample, I will be using the Social Media Widget by Acurax. To follow with me, first, from your WordPress dashboard > Plugins you need to search for the plugin and click Install Now > Activate.
Once done, you will have a new toolkit included in the right menu, called “Social Media Widget Settings”. Click on it and start customizing.
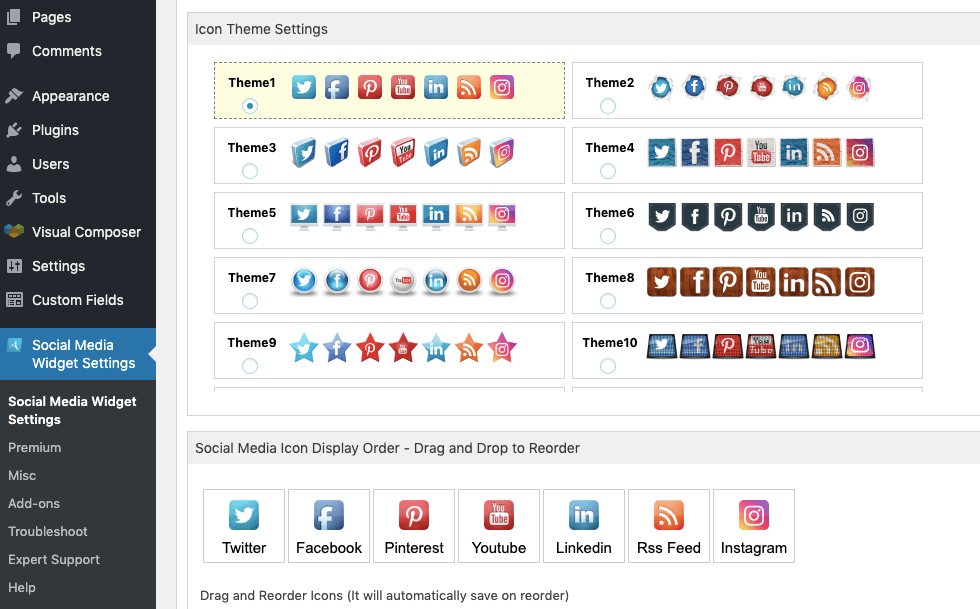
Here you choose the look of your icons, the order which you can reorder as you like. Once done, all you have to do is do social media configuration, adding URLs and user names, and click Save.
Now when you go to Appearance > Widgets, you will see a new Social Media Widget element available to drag to one of your Widget Areas.
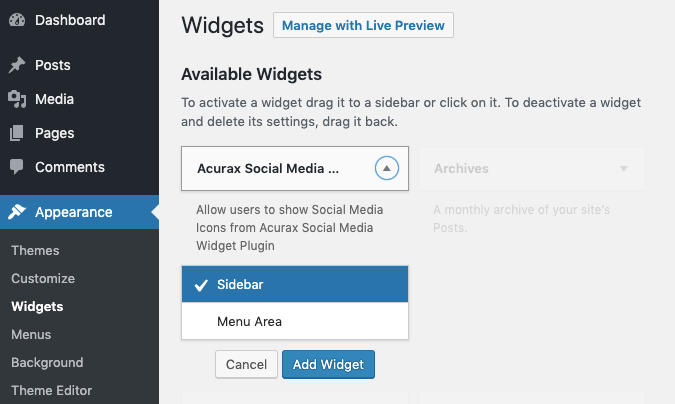
I chose to add my social media icons (YouTube, Instagram, and Facebook) to the Menu Widget Area to display them on the top of my blog.

Now when you know how to add customized Widget to your WordPress site, let's continue with the list of other useful Widgets.
Newsletter Sign Up Box Widget
A place for your website visitors to enter their information - email, name, and other data relevant to the offer. Then the information left by the reader is sent to the subscription service. Here are just a few of Newsletter Sign Up or Subscription Box plugins (Widgets) here:
Instagram Feed Widget
All or some of your inspiring Instagram photos can be shown up on your website by using an appropriate widget. Reposting Instagram can really boost your site with an extra glance of colorful photography. Below you will find some of the useful Instagram Feed plugins:
Google Map Widget
A very useful Widget if you need to show a physical location. By placing a store address in the sidebar, your header or footer will allow your visitors to easily find your business address. Introducing with some of the wide range of Google Map widgets:
Login Area Widget
Username and password field if your website provides a membership service. Check out some of the following Widgets:
Authors Widget
If your WordPress site consists of articles written by different authors, then Widget for Authors will be useful, allowing you to put a list of bloggers with a link to that specific author's posts.
Quick Contact Widget
A contact form for your visitors that provides quick communication for any issue. Instead of building a special landing page for a contact form, you can use the Widget offered by several plugin owners, some of them:
Related Posts Widget
Related posts are a good way to keep your readers stay on your blog. Place a Widget below the posts area to display your other content in the footer. Try one of the following free related posts widgets:
Pricing Table Widget
This Widget allows you to display the prices of different products or services where it will attract the visitor's attention. You can place a Pricing Table Widget on the sidebar or in the middle of the main content. With the help of a relevant plugin, you can locate your price table as you like. Here are some of the most popular plugins that allow Pricing Table Widgets:
- Pricing Table – Price list, Price Table, Easy Pricing Table
- Responsive Pricing Table
- WRC Pricing Tables
Above I made an in-depth list of most popular Widgets, however, it is not complete. Below you can find more Widgets that you may find useful in a particular web project.
- Social Count and Share Buttons
- Featured Posts
- Popular Posts
- Posts from a specific Category
- Testimonials Widget
- Image Slider
- Reviews
- Advertising
- Weather
- Social Media Feed (Facebook, Twitter, Pinterest, etc.)
- Facebook Like Button
You can always find third-party plugins for Widget you need by simply search one using Google or WordPress.org repository.
Now that we have looked at how to add Widgets using WordPress's features (sometimes limited because of defined Widget Areas) it is time to learn more advanced approaches. If you make your website using a drag and drop website builder then you will find it interesting to learn how the Visual Composer offers to use WordPress default Widget and WordPress custom Widgets in its front-end editor.
Add WordPress Widgets Using Visual Composer
Visual Composer Website Builder allows you to add two types of WordPress Widgets: default and custom widgets. The best thing is that you can choose where to place the Widget. So, using the Visual Composer that works as a theme builder, you no longer depend on the defined Widget Areas.
All you have to do is prepare the Widget layout from Appearance > Widgets as we did before and then add it through the Visual Composer editor (with the help of an element) wherever you want.
To add a WordPress widget, open a post or a page using Visual Composer editor and search for the “Widgetized Sidebar” element inside the Visual Composer Hub. Once you add the element to your layout you will see Edit window with parameters and drop-down to select a specific Widget.
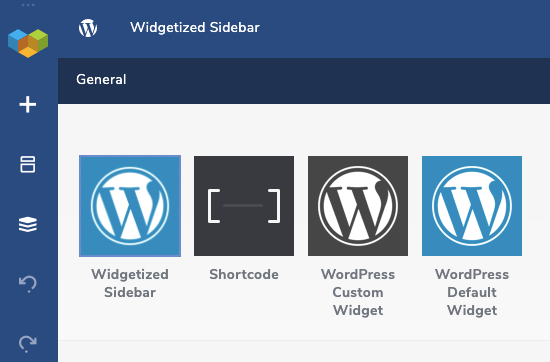
WordPress Default Widgets
WordPress Widget content element allows you to add any WordPress default widget.
The Widget will automatically retrieve all available widgets and set them as an option within the drop-down menu.

WordPress Custom Widgets
WordPress Custom Widget content element allows you to add any custom widget that has been added to your WordPress site via 3rd party plugin or theme.
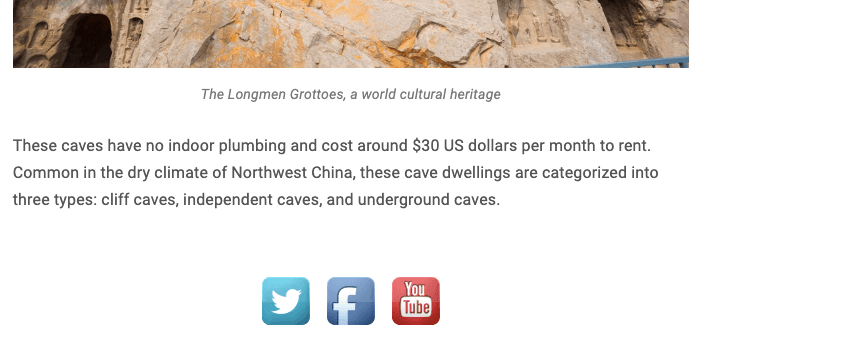
As you remember, I was available to place Social Media Icons Widget only on two areas: Sidebar and Menu. But using Visual Composer along with the WordPress Custom Widget element, I am free to choose the widget location. Here you can see that I have added social icons widget in the footer of my travel blog:
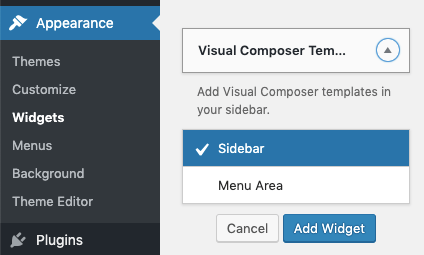
In addition to these Visual Composer elements, you have the ability to manage Visual Composer-made templates from WordPress dashboard > Appearance > Widgets.
Visual Composer Template Widgets
To add a Visual Composer Widget, search for the Template Widget element inside the Visual Composer Hub, and click download (available for Premium users). The WordPress will recognize the new Visual Composer Widget element and include it the available widgets on Appearance > Widgets.
Pre-designed modules, such as subscribe form, call to action buttons, contact form, promotional banners, testimonials or social icons, can now be added to your site using a well-known manner.
In order to add a template widget, first, you need to have saved Visual Composer template. Once you have that, you are ready to add the widget:
- Navigate to Appearance > Widgets in your WordPress admin panel;
- Drag and drop the widget to the sidebar area;
- Choose a template from “Visual Composer Template Widget” to be displayed in the sidebar of your site, and click Save.
Summary
WordPress Widgets and Widget Areas is an effective way to complement your website with various features and information. Your page visitors will appreciate being able to find the information they need: contact form, your social accounts, prices, etc.
In this article, you learned that there are different ways to add Widgets and how to prepare (choose the right theme) to make the Widget Area available. Plus, you are familiar with the easy way to manage your Widgets using the advanced Visual Composer WordPress Widget elements.

Excellent tutorial.I have a wordpress site. This tutorial is really helpful our website.
Ethan Putterman. Ethan Putterman is on Facebook. Join Facebook to connect with Ethan Putterman and others you may know. Facebook gives people the power to share and makes the world more open and connected. First Ascent: Cameron Burns, Benny Bach and Ethan Putterman (per report only the first 2 reached the summit). The best resources are: Rock Climbing Utah by…the 250-foot Oompah Tower, just a few hundred feet south of Jolly Tower, via Ethan Putterman and the Chocolate Factory (III 5.9 Cl). Ethan (Ethan Putterman) Putterman (He/Him) Student at Columbia University in the City of New York… Ethan Bueno de Mesquita. Charles S. Bullock, III … Ethan Putterman. Dennis P. Quinn. Kevin Quinn… Rand Putterman, Ethan Putterman, Pamela Putterman, Daniele Putterman … Houston, TX • Atlanta, GA • New Orleans, LA • Columbia, SC. Related to… Mr Ethan Putterman (pictured) has been sacked from the National University of Singapore following reports of inappropriate behaviour with a student. Ethan Putterman on Instagram: Happy Birthday to my wife, the love of my life, and best friend! More and more beautiful every passing day! Love you…Jun 8, 2020 — 15 likes, 0 comments – Ethan Putterman (@putterman023) on Instagram: “Kodak moment on the course from last night…Ethan Putterman on Instagram: Golf Season Never Ends…“Win or lose we still boozed” tough loss but had a great weekend!…Putterman focuses on Public good, China, Incentive, Microeconomics and Social psychology. His work deals with themes such as Public economics, Collective action, Sanctions, Punishment and Punishment, which intersect with Public good. In Collective action…Putterman works on issues like Law and economics, which are connected to Order…E. Putterman is an obstetrician-gynecologist in Garden City, New York and is affiliated with North Shore University Hospital at Northwell Health..She received her medical degree from SUNY Upstate Medical University and has been in practice for more than 20 years…Allegations of sexual misconduct Mothership understands that Ethan Putterman, an associate professor in the political science department in the Faculty of Arts and Social Sciences (FASS), was…Ethan Jordan Putterman (born 1991) is listed at 3690 River Isle Ct Ne Rockford, Mi 49341 and has no known political party affiliation. He is a male registered to vote in Kent County, Michigan…Mr Ethan Putterman, an associate professor at NUS’ political science department, had his employment terminated after it was found that he behaved inappropriately and unprofessionally towards a student. In response to queries from The Straits Times about Mr Putterman, a spokesman for NUS’ Faculty of Arts and Social Sciences said a police report…Putterman, a UCLA physics professor and the study’s senior author. “What we showed is that our system of microwave-generated sound produced gravity so strong that Earth’s gravity wasn’t a factor. We don’t need to go into space to do these experiments anymore.” Oompah Tower – Ethan Putterman and the Chocolate Factory… Pitch 2- Start by reaching left 2 meters to a pin in a shallow, right-facing corner. Continue up a crack in the corner to a large ledge with loose rocks and two bolts. (30 feet)… April 30, 2022 · Shared with Public Follow An NUS professor, Ethan Putterman, has just been fired due to alleged sexual misconduct against a student. But he said that wasn’t the truth—here’s what happened: See less Comments Most relevant Louisa Louisa NUS again and again. So what if its high academic acclaimed? No integrity and no moral values…In this clear and engaging book, economist Putterman places the economy and the study of economics in a broad historical and social perspective. He explores the history of the discipline, the history of the modern economy, different perspectives on…Putterman who runs the lab in which it was made. This undated composite image provided by the UCLA Laboratory of Low Temperatures and Acoustics, shows an image of an x-ray made with Scotch tape superimposed on a hand on top of a vacuum chamber…Image Credit: AP Photo/ UCLA Laboratory of Low Temperatures and Acoustics, Carlos Camara, Juan V. Escobar…Ethan Putterman. Ethan Putterman is on Facebook. Join Facebook to connect with Ethan Putterman and others you may know. Facebook gives people the power to share and makes the world more open and connected…Ethan (Ethan Putterman) Putterman (He/Him) Student at Columbia University in the City of New York… Ethan Bueno de Mesquita. Charles S. Bullock, III … Ethan Putterman. Dennis P. Quinn. Kevin Quinn… Rand Putterman, Ethan Putterman, Pamela Putterman, Daniele Putterman … Houston, TX • Atlanta, GA • New Orleans, LA • Columbia, SC. Related to… Bargaining in Bicameral Legislatures : When and Why Does Malapportionment Matter ?, Stephen Ansolabehere, James M. Snyder, Jr., Michael M. Ting, p. 471-481…Ora-orn Poocharoen, Ethan Putterman, Qian Jiwei, Qin Hui, Gideon Rachman, … Kristin Stapleton, Andrew Stark, Su Jun, Anna Sun, Sun Hsiao-Li Shirley…Ethan Andrew is a TikTok Star born on September 07, 2005 in the United States. He has gained a large following on the platform and has become a well-known figure in the social media world. Ethan Putterman His net worth, biography, age, height, family, and career updates can all be found online. SINGAPORE — National University of Singapore (NUS) professor Ethan Putterman, who was sacked for inappropriate behaviour towards a student, had last month admitted his mistake and offered to…E. Putterman is an obstetrician-gynecologist in Garden City, New York and is affiliated with North Shore University Hospital at Northwell Health..She received her medical degree from SUNY Upstate Medical University and has been in practice for more than 20 years.AN HONEST HEART AND KNOWING HEAD…I would like to thank my committee members: Horst Mewes, Steven Vanderheiden, Claudia Mills, and ETHAN PUTTERMAN, as well as Michaele Ferguson, who commented on an earlier draft of Chapter Two and provided invaluable feedback…Mr Ethan Putterman, an associate professor at NUS’ political science department, had his employment terminated after it was found that he behaved inappropriately and unprofessionally towards a student. In response to queries from The Straits Times about Mr Putterman, a spokesman for NUS’ Faculty of Arts and Social Sciences said…He registered for Instagram and YouTube with a username of EthanGoKrazy…Ethan Jordan Putterman (born 1991) is listed at 3690 River Isle Ct Ne Rockford, Mi 49341 and has no known political party affiliation. He is a male registered to vote in Kent County, Michigan… An NUS professor, Ethan Putterman, has just been fired due to alleged sexual misconduct against a student. But he said that wasn’t the truth—here’s what happened: See less Comments Most relevant Louisa Louisa NUS again and again. So what if its high academic acclaimed? No integrity and no moral values…Putterman is professor of medicine and of microbiology & immunology at Einstein and associate dean for research at the Azrieli Faculty of Medicine at Bar-Ilan…Mr Ethan Putterman, an associate professor at NUS’ political science department, had his employment terminated after it was found that he behaved inappropriately and unprofessionally towards a student. In response to queries from The Straits Times about Mr Putterman, a spokesman for NUS’ Faculty of Arts and Social Sciences said a police report…Ethan Putterman on Instagram: Happy Birthday to my wife, the love of my life, and best friend! More and more beautiful every passing day! Love you…Jun 8, 2020 — 15 likes, 0 comments – Ethan Putterman (@putterman023) on Instagram: “Kodak moment on the course from last night…Putterman who runs the lab in which it was made. This undated composite image provided by the UCLA Laboratory of Low Temperatures and Acoustics, shows an image of an x-ray made with Scotch tape superimposed on a hand on top of a vacuum chamber…Image Credit: AP Photo/ UCLA Laboratory of Low Temperatures and Acoustics, Carlos Camara, Juan V. Escobar…In response to CNA’s queries about Mr Putterman’s identity and alleged misconduct, a spokesperson for NUS Faculty of Arts and Social Sciences (FASS) said it received a complaint regarding allegations of misconduct by a faculty member towards a student. NUS did not confirm Mr Putterman’s identity or provide details about his alleged misconduct…Putterman is a Professor of Physics and Astronomy at the California NanoSystems Institute at the University of California, Los Angeles…Ethan Putterman on Instagram: Golf Season Never Ends…“Win or lose we still boozed” tough loss but had a great weekend!.. Singapore · Trainer, Sales and Project Coordinator · Freelance. People also viewed. Ethan Putterman. Student at Columbia University in the City of New York. Singapore · Hwee Cheng Lim. Human Resource Manager. Singapore Allegations of sexual misconduct Mothership understands that Ethan Putterman, an associate professor in the political science department in the Faculty of Arts and Social Sciences (FASS), was…Ethan (Ethan Putterman) Putterman (He/Him) Student at Columbia University in the City of New York… Ethan Bueno de Mesquita. Charles S. Bullock, III … Ethan Putterman. Dennis P. Quinn. Kevin Quinn… Rand Putterman, Ethan Putterman, Pamela Putterman, Daniele Putterman … Houston, TX • Atlanta, GA • New Orleans, LA • Columbia, SC. Related to…Mr Ethan Putterman (pictured) has been sacked from the National University of Singapore following reports of inappropriate behaviour with a student… E. Putterman is an obstetrician-gynecologist in Garden City, New York and is affiliated with North Shore University Hospital at Northwell Health..She received her medical degree from SUNY Upstate Medical University and has been in practice for more than 20 years…Putterman, a UCLA physics professor and the study’s senior author. “What we showed is that our system of microwave-generated sound produced gravity so strong that Earth’s gravity wasn’t a factor. We don’t need to go into space to do these experiments anymore.”..Putterman focuses on Public good, China, Incentive, Microeconomics and Social psychology. His work deals with themes such as Public economics, Collective action, Sanctions, Punishment and Punishment, which intersect with Public good. In Collective action…Putterman works on issues like Law and economics, which are connected to Order…Ethan putterman. Ethan Putterman is on Facebook. Join Facebook to connect with Ethan Putterman and others you may know. Facebook gives people the power to share and makes the world more open and connected.Allegations of sexual misconduct MOTHERSHIP understands that Ethan Putterman, an associate professor in the political science department in the Faculty of Arts and Social Sciences (FASS), was…AN HONEST HEART AND KNOWING HEAD…I would like to thank my committee members: Horst Mewes, Steven Vanderheiden, Claudia Mills, and ETHAN PUTTERMAN, as well as Michaele Ferguson, who commented on an earlier draft of Chapter Two and provided invaluable feedback. Apr 29, 2022 · Associate Professor Ethan Putterman from NUS’ political science department had his employment terminated after it was found that he had behaved inappropriately and unprofessionally towards a..Jun 3, 2022 — Ethan Putterman, University of Singapore Stijn Rottiers, Universiteit Antwerpen, Alan Scott, University of New England…In this clear and engaging book, economist Putterman places the economy and the study of economics in a broad historical and social perspective. He explores the history of the discipline, the history of the modern economy, different perspectives on…Putterman focuses on Public good, China, Incentive, Microeconomics and Social psychology. His work deals with themes such as Public economics, Collective action, Sanctions, Punishment and Punishment, which intersect with Public good. In Collective action…Putterman works on issues like Law and economics, which are connected to Order…Felix Koch, Columbia University, New York, USA… Mr Ethan Putterman (pictured) has been sacked from the National University of Singapore following reports of inappropriate behaviour with a student…Putterman who runs the lab in which it was made. This undated composite image provided by the UCLA Laboratory of Low Temperatures and Acoustics, shows an image of an x-ray made with Scotch tape superimposed on a hand on top of a vacuum chamber…Image Credit: AP Photo/ UCLA Laboratory of Low Temperatures and Acoustics, Carlos Camara, Juan V. Escobar…The Queen of America in New York City Ethan Putterman and Suchi Gururaj provided valuable research aid; Leslie Patterson, Dana Seitler, Gwen Harrigan, Burton Avery, Satre. Allegations of sexual misconduct Mothership understands that Ethan Putterman, an associate professor in the political science department in the Faculty of Arts and Social Sciences (FASS), was… First Ascent: Cameron Burns, Benny Bach and Ethan Putterman (per report only the first 2 reached the summit). The best resources are: Rock Climbing Utah by…the 250-foot Oompah Tower, just a few hundred feet south of Jolly Tower, via Ethan Putterman and the Chocolate Factory (III 5.9 Cl) Apr 29, 2022 · Ethan Putterman, a political science professor at NUS, was fired after he acted unethically with students….Putterman has been a member of Brown’s Economics Department since 1980. He was a past director of the Development Studies undergraduate and (no longer extant) masters programs. His early research in the developing world focused on China and Tanzania. Daryl Choo Published April 29, 2022 Updated April 29, 2022 SINGAPORE — National University of Singapore (NUS) professor Ethan Putterman, who was sacked for Hi, I’m Ethan Andrew, I write stories I grew up enthralled with games. Everything from Half-Life to Halo inspired me to want to be a writer for them. Since then, I have gotten my degree in game design, worked on several small projects… Ethan Jordan Putterman (born 1991) is listed at 3690 River Isle Ct Ne Rockford, Mi 49341 and has no known political party affiliation. He is a male registered to vote in Kent County, Michigan…AN HONEST HEART AND KNOWING HEAD…I would like to thank my committee members: Horst Mewes, Steven Vanderheiden, Claudia Mills, and ETHAN PUTTERMAN, as well as Michaele Ferguson, who commented on an earlier draft of Chapter Two and provided invaluable feedback.Ethan (Ethan Putterman) Putterman (He/Him) Student at Columbia University in the City of New York… Ethan Bueno de Mesquita. Charles S. Bullock, III … Ethan Putterman. Dennis P. Quinn. Kevin Quinn… Rand Putterman, Ethan Putterman, Pamela Putterman, Daniele Putterman … Houston, TX • Atlanta, GA • New Orleans, LA • Columbia, SC. Related to… Ethan Putterman on Instagram: Golf Season Never Ends…“Win or lose we still boozed” tough loss but had a great weekend!.. Mr Ethan Putterman (pictured) has been sacked from the National University of Singapore following reports of inappropriate behaviour with a student…Putterman focuses on Public good, China, Incentive, Microeconomics and Social psychology. His work deals with themes such as Public economics, Collective action, Sanctions, Punishment and Punishment, which intersect with Public good. In Collective action…Putterman works on issues like Law and economics, which are connected to Order…This is further connected to democratic ideals through the work of Ethan Putterman, who describes what a strong democracy should entail: Knowledge of how to govern is “communal and consensual,” and through the holding of televised debates, town hall meetings, referendums, plebiscites, open ballot initiatives, and other practical expressions of citizen self-rule, the people “deepen” the quality of democracy by expressing their will directly. (459) In response to CNA’s queries about Mr Putterman’s identity and alleged misconduct, a spokesperson for NUS Faculty of Arts and Social Sciences (FASS) said it received a complaint regarding allegations of misconduct by a faculty member towards a student. NUS did not confirm Mr Putterman’s identity or provide details about his alleged misconduct…Ethan Putterman on Instagram: Happy Birthday to my wife, the love of my life, and best friend! More and more beautiful every passing day! Love you…Jun 8, 2020 — 15 likes, 0 comments – Ethan Putterman (@putterman023) on Instagram: “Kodak moment on the course from last night…Ethan Putterman on Instagram: Golf Season Never Ends…“Win or lose we still boozed” tough loss but had a great weekend!..Ethan putterman. Ethan Putterman is on Facebook. Join Facebook to connect with Ethan Putterman and others you may know. Facebook gives people the power to share and makes the world more open and connected…Allegations of sexual misconduct MOTHERSHIP understands that Ethan Putterman, an associate professor in the political science department in the Faculty of Arts and Social Sciences (FASS), was…The Queen of America in New York City Ethan Putterman and Suchi Gururaj provided valuable research aid; Leslie Patterson, Dana Seitler, Gwen Harrigan, Burton Avery, Satre…Putterman, a UCLA physics professor and the study’s senior author. “What we showed is that our system of microwave-generated sound produced gravity so strong that Earth’s gravity wasn’t a factor. We don’t need to go into space to do these experiments anymore.”April 30, 2022 · Shared with Public Follow An NUS professor, Ethan Putterman, has just been fired due to alleged sexual misconduct against a student. But he said that wasn’t the truth—here’s what happened: See less Comments Most relevant Louisa Louisa NUS again and again. So what if its high academic acclaimed? No integrity and no moral values. E. Putterman is an obstetrician-gynecologist in Garden City, New York and is affiliated with North Shore University Hospital at Northwell Health..She received her medical degree from SUNY Upstate Medical University and has been in practice for more than 20 years..In this clear and engaging book, economist Putterman places the economy and the study of economics in a broad historical and social perspective. He explores the history of the discipline, the history of the modern economy, different perspectives on…The Queen of America Goes To New York City…Putterman who runs the lab in which it was made. This undated composite image provided by the UCLA Laboratory of Low Temperatures and Acoustics, shows an image of an x-ray made with Scotch tape superimposed on a hand on top of a vacuum chamber…Image Credit: AP Photo/ UCLA Laboratory of Low Temperatures and Acoustics, Carlos Camara, Juan V. Escobar…My name is Ethan Andrew and I am a 23 year old DJ & Producer born & raised in the Logan Square neighborhood of Chicago Illinois. Hi, I’m Ethan Andrew, I write stories I grew up enthralled with games. Everything from Half-Life to Halo inspired me to want to be a writer for them. Since then, I have gotten my degree in game design, worked on several small projects…Putterman is professor of medicine and of microbiology & immunology at Einstein and associate dean for research at the Azrieli Faculty of Medicine at Bar-Ilan…Apr 29, 2022 · Associate Professor Ethan Putterman from NUS’ political science department had his employment terminated after it was found that he had behaved inappropriately and unprofessionally towards a… Ethan Putterman on Instagram: Happy Birthday to my wife, the love of my life, and best friend! More and more beautiful every passing day! Love you…Jun 8, 2020 — 15 likes, 0 comments – Ethan Putterman (@putterman023) on Instagram: “Kodak moment on the course from last night…Ethan Putterman on Instagram: Golf Season Never Ends…“Win or lose we still boozed” tough loss but had a great weekend!..In response to CNA’s queries about Mr Putterman’s identity and alleged misconduct, a spokesperson for NUS Faculty of Arts and Social Sciences (FASS) said it received a complaint regarding allegations of misconduct by a faculty member towards a student. NUS did not confirm Mr Putterman’s identity or provide details about his alleged misconduct..First Ascent: Cameron Burns, Benny Bach and Ethan Putterman (per report only the first 2 reached the summit). The best resources are: Rock Climbing Utah by…the 250-foot Oompah Tower, just a few hundred feet south of Jolly Tower, via Ethan Putterman and the Chocolate Factory (III 5.9 Cl). Cameron M. Burns…Mr Ethan Putterman, an associate professor at NUS’ political science department, had his employment terminated after it was found that he behaved inappropriately and unprofessionally towards a student. In response to queries from The Straits Times about Mr Putterman, a spokesman for NUS’ Faculty of Arts and Social Sciences said…Benny Bach, Cameron Burns, Ethan Putterman. May 25: North Butte of the Cross via West Chimneys. Paul Horton, Lynn Watson. Oct: Pinnacles North Tower (Glen … Putterman is a Professor of Physics and Astronomy at the California NanoSystems Institute at the University of California, Los Angeles… Mr Ethan Putterman, an associate professor at NUS’ political science department, had his employment terminated after it was found that he behaved inappropriately and unprofessionally towards a student. In response to queries from The Straits Times about Mr Putterman, a spokesman for NUS’ Faculty of Arts and Social Sciences said a police report. Putterman (born December 18, 1945) is an American physicist. He is known to have an eclectic approach to research topics that broadly revolves around energy-focusing phenomena in nonlinear, continuous systems, with particular interest in turbulence…Putterman, a UCLA physics professor and the study’s senior author. “What we showed is that our system of microwave-generated sound produced gravity so strong that Earth’s gravity wasn’t a factor. We don’t need to go into space to do these experiments anymore.”..Putterman focuses on Public good, China, Incentive, Microeconomics and Social psychology. His work deals with themes such as Public economics, Collective action, Sanctions, Punishment and Punishment, which intersect with Public good. In Collective action…Putterman works on issues like Law and economics, which are connected to Order…Daryl Choo Published April 29, 2022 Updated April 29, 2022 SINGAPORE — National University of Singapore (NUS) professor Ethan Putterman, who was sacked for…Ethan Jordan Putterman (born 1991) is listed at 3690 River Isle Ct Ne Rockford, Mi 49341 and has no known political party affiliation. He is a male registered to vote in Kent County, Michigan…Putterman who runs the lab in which it was made. This undated composite image provided by the UCLA Laboratory of Low Temperatures and Acoustics, shows an image of an x-ray made with Scotch tape superimposed on a hand on top of a vacuum chamber…Image Credit: AP Photo/ UCLA Laboratory of Low Temperatures and Acoustics, Carlos Camara, Juan V. Escobar…The Queen of America in New York City Ethan Putterman and Suchi Gururaj provided valuable research aid; Leslie Patterson, Dana Seitler, Gwen Harrigan, Burton Avery, Satre…An NUS professor, Ethan Putterman, has just been fired due to alleged sexual misconduct against a student. But he said that wasn’t the truth—here’s what happened: See less Comments Most relevant Louisa Louisa NUS again and again. So what if its high academic acclaimed? No integrity and no moral values…SINGAPORE — National University of Singapore (NUS) professor Ethan Putterman, who was sacked for inappropriate behaviour towards a student, had last month admitted his mistake and offered to… …In this clear and engaging book, economist Putterman places the economy and the study of economics in a broad historical and social perspective. He explores the history of the discipline, the history of the modern economy, different perspectives on…Putterman is professor of medicine and of microbiology & immunology at Einstein and associate dean for research at the Azrieli Faculty of Medicine at Bar-Ilan..Daryl Choo Published April 29, 2022 Updated April 29, 2022 SINGAPORE — National University of Singapore (NUS) professor Ethan Putterman, who was sacked for Putterman is professor of medicine and of microbiology & immunology at Einstein and associate dean for research at the Azrieli Faculty of Medicine at Bar-Ilan…Putterman is professor of medicine and of microbiology & immunology at Einstein and associate dean for research at the Azrieli Faculty of Medicine at Bar-Ilan… Allegations of sexual misconduct Mothership understands that Ethan Putterman, an associate professor in the political science department in the Faculty of Arts and Social Sciences (FASS), was…Ethan Putterman on Instagram: Happy Birthday to my wife, the love of my life, and best friend! More and more beautiful every passing day! Love you…Jun 8, 2020 — 15 likes, 0 comments – Ethan Putterman (@putterman023) on Instagram: “Kodak moment on the course from last night…Putterman who runs the lab in which it was made. Putterman has been a member of Brown’s Economics Department since 1980. He was a past director of the Development Studies undergraduate and (no longer extant) masters programs. Apr 29, 2022 · Associate Professor Ethan Putterman from NUS’ political science department had his employment terminated after it was found that he had behaved inappropriately and unprofessionally towards a..His early research in the developing world focused on China and Tanzania. Hi, I’m Ethan Andrew, I write stories I grew up enthralled with games. Everything from Half-Life to Halo inspired me to want to be a writer for them. Since then, I have gotten my degree in game design, worked on several small projects…Putterman has been a member of Brown’s Economics Department since 1980. He was a past director of the Development Studies undergraduate and (no longer extant) masters programs… Ethan putterman. Ethan Putterman is on Facebook. Join Facebook to connect with Ethan Putterman and others you may know. Facebook gives people the power to share and makes the world more open and connected. His early research in the developing world focused on China and Tanzania…E. Putterman is an obstetrician-gynecologist in Garden City, New York and is affiliated with North Shore University Hospital at Northwell Health..She received her medical degree from SUNY Upstate Medical University and has been in practice for more than 20 years… Putterman is a Professor of Physics and Astronomy at the California NanoSystems Institute at the University of California, Los Angeles…In response to CNA’s queries about Mr Putterman’s identity and alleged misconduct, a spokesperson for NUS Faculty of Arts and Social Sciences (FASS) said it received a complaint regarding allegations of misconduct by a faculty member towards a student. NUS did not confirm Mr Putterman’s identity or provide details about his alleged misconduct…Apr 29, 2022 · Ethan Putterman, a political science professor at NUS, was fired after he acted unethically with students…In this clear and engaging book, economist Putterman places the economy and the study of economics in a broad historical and social perspective. He explores the history of the discipline, the history of the modern economy, different perspectives on…Putterman, a UCLA physics professor and the study’s senior author. “What we showed is that our system of microwave-generated sound produced gravity so strong that Earth’s gravity wasn’t a factor. We don’t need to go into space to do these experiments anymore.” Ethan Putterman on Instagram: Happy Birthday to my wife, the love of my life, and best friend! More and more beautiful every passing day! Love you…Jun 8, 2020 — 15 likes, 0 comments – Ethan Putterman (@putterman023) on Instagram: “Kodak moment on the course from last night…Ethan Putterman on Instagram: Golf Season Never Ends…“Win or lose we still boozed” tough loss but had a great weekend!.. SINGAPORE — National University of Singapore (NUS) professor Ethan Putterman, who was sacked for inappropriate behaviour towards a student, had last month admitted his mistake and offered to… Putterman focuses on Public good, China, Incentive, Microeconomics and Social psychology. His work deals with themes such as Public economics, Collective action, Sanctions, Punishment and Punishment, which intersect with Public good. In Collective action…Putterman works on issues like Law and economics, which are connected to Order…Mr Ethan Putterman, an associate professor at NUS’ political science department, had his employment terminated after it was found that he behaved inappropriately and unprofessionally towards a student. In response to queries from The Straits Times about Mr Putterman, a spokesman for NUS’ Faculty of Arts and Social Sciences said…Putterman who runs the lab in which it was made. This undated composite image provided by the UCLA Laboratory of Low Temperatures and Acoustics, shows an image of an x-ray made with Scotch tape superimposed on a hand on top of a vacuum chamber…Image Credit: AP Photo/ UCLA Laboratory of Low Temperatures and Acoustics, Carlos Camara, Juan V. Escobar…