Here you will learn how to create a WordPress child theme. You will have prepared codes for the style.css file and functions.php, all you have to do is copy / paste them. Additionally, you can download a ready-made child theme example for the Visual Composer Starter theme.
Ready to jump in? Let's go! 🤖
One of the greatest benefits to using WordPress is that you can take advantage of a large number of ready-made themes, all of which are customizable by users with ease. However, this customizability comes at the cost of maintenance in case your customization project isn't compatible when an update happens on your chosen theme.
So, if you're a WordPress user, it's best to create child themes on each of your sites. This is the only way that you can avoid losing all of your hard work if an update overwrites customizations made in the original theme files.
What Is A Child Theme
A WordPress child theme is a separate style sheet that changes the look of your parent's themes styling and adds extra functionality to a WordPress website.
Firstly, it allows developers and designers to modify the design of a website with minimum disruption. If you want one part of your site in red but most other parts blue, then creating a separate child theme for each section would be far less disruptive than modifying every page on the site (which could break things).
Secondly - and more importantly from a technical standpoint - child themes existence means that it is possible to update an entire WordPress installation without ever touching any core files or data stored within them.
Benefits Of A Child Theme
There are many benefits to creating a child theme for your WordPress site. A parent theme is pre-built and already functional, so you can make some great modifications without wrecking the original functionality of it or requiring extensive development on your end.
Some of these include:
- Making sure that customizations will be portable and replicable;
- Keeping customization separate from functions in the main files (this allows updates to affect only those parts);
- Allowing parents themes to receive bug fixes by overwriting CSS/themes rather than reworking all changes;
- Saving time as you're not recreating something which has been tested beforehand - this also means learning new skills rather than relying on old ones if they no longer apply correctly.
How to Create A WordPress Child Theme
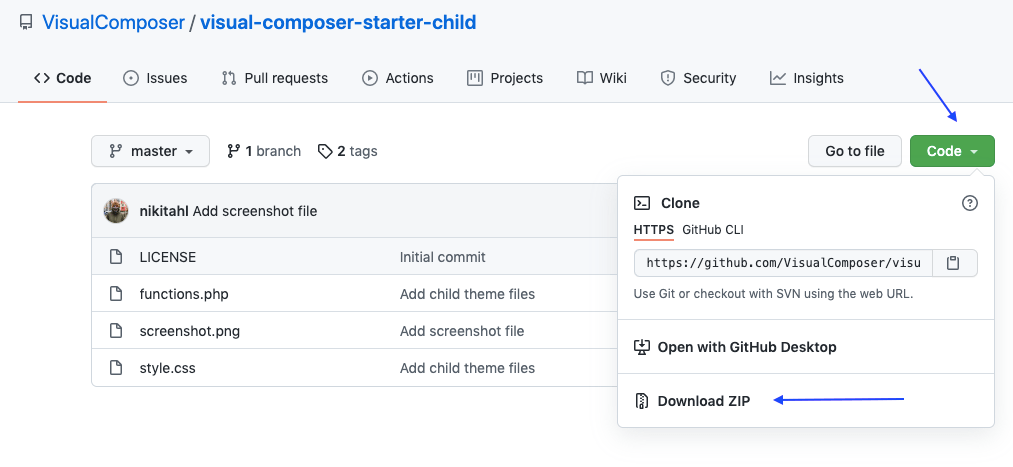
In this tutorial, I will be using the Visual Composer Starter theme. Here you can download a free child theme example for the Starter theme - child theme zip file.
For those who want to go through the process, let's keep on going further and make a new directory in the theme folder. Use either the cPanel or upload your file via FTP. The themes directory can be found in wp-content/themes.
Create a Child Theme Folder
To create a child theme folder, first, open your file manager and navigate to the wp-content/themes directory. Once you are there, create a new folder. Name the child theme whatever you want, but something clear and easy would be great. I recommend using themename-child.
Create a stylesheet: style.css
In your child theme folder create style.css file and add a stylesheet header to the file (if you're using a Stater theme, simply copy/paste).
/*
Theme Name: Visual Composer Starter Child Theme
URI: https://visualcomposer.com
Description: Visual Composer Starter child theme
Author: The Visual Composer Team Author
URI: https://visualcomposer.com
Template: visual-composer-starter
Version: 1.0.0 License: GNU General Public License v2 or later License
URI: http://www.gnu.org/licenses/gpl-2.0.html
Tags: light, blog, starter, responsive-layout, accessibility-ready, sandwich-menu
Text Domain: visual-composer-starter-child
*/
Now you should create functions.php and add the following code:
add_action( ‘wp_enqueue_scripts’, ‘enqueue_parent_styles’ );

function enqueue_parent_styles() {
wp_enqueue_style( ‘parent-style’, get_template_directory_uri().’/style.css’ );
Note: If you want to create a custom cover image for your theme - create image 1200×900 pixels, name it screenshot.png and upload it to your child theme folder.
💡 If you would like to learn more about CSS, here is a nice post on how to modify WordPress CSS styles - with a video tutorial!
Now it's time to install and activate the child theme.
Install + Activate The Child Theme
To install the child theme, you can either upload it via FTP or create a zip file of that folder and then click on Appearance - Themes - Add New in order to import to WordPress. After the installation, the last step is to activate the child theme.
Style.css Values
It is important to add proper values to your child theme style.css to work properly.
- Theme Name: The name of the theme that will appear in your WordPress;
- Theme URI: A URL to the theme demonstration which is required if you wish to push your theme to the WordPress theme repository;
- Description: Theme description that will appear in your WordPress by clicking on the Theme Details option;
- Author: The author of the theme – you;
- Author URI: Author website address;
- Template: The most important part – is the place where you need to specify the name of the parent theme folder. This is case-sensitive and needs to be 100% correct in order to function as a child theme;
- Version: A version of your child theme that is suggested to start with 1.0;
- License: Specify the license of your child theme. Make sure that your license is the same as your parent theme license;
- License URI: Link to the license explanation, again you should follow your parent theme licensing;
- Tags: Tags that are relevant to your child’s theme;
- Text domain: Used to make your theme translatable and should fit the ‘slug’ of your theme.
And remember, if the lines of code seem complicated to you, here you can download a free child theme example for the Starter theme.

Great Post!!! Very much informative trends on the website
You have mentioned good points for knowledge. I would like to add some short methods for creating a wordpress child theme. Check them below:
Step1: Set up a new folder
Step2: Create a style.css file
Step3: Add the required information
Step4: Enqueue the parent and child theme stylesheets
Step5: Activate the child theme
Step6: Customize the child theme
Step7: Update and maintain your child theme
These are some short points. Readers, If you want to develop your wordpress website, you can visit an IT company like Alakmalak technologies. They have 17+ years of experience in this field.
I have read your blog on the benefit of child theme in WordPress. It was very interesting and helpful but I can add some extra points in your article. Here some extra points:
1.Keeping Changes After Updates. One of the biggest problems with modifying a theme is when updates occur.
2.Keeping Original Safe.
3.No FTP Required.
4.Faster Development.
These are some extra points to add to your article. Readers if you are confused about your web and App development , you can get a free consultation at Alakmalak technologies.Visit our site for more information.