WordPress is a great platform for managing multiple sites but can be tough to keep up with all your needs. That's why we recommend using the multisite feature! With it, you can create networks of websites that share one dashboard and take care of everything together - making it easier than ever before not to have any problems when managing dozens or even hundreds of different blogs/websites from one place alone.
Take a look at the multisite world!
What is a WordPress Multisite Network?
With a WordPress Multisite network, you can have multiple sites on one installation that all use the same login. You can allow other people to create their own blogs for your domain and customize each website's settings individually.
Who Needs a WordPress Multisite Network?
Just because you manage multiple WordPress websites does not mean that a multisite network is the best option for your business.
There are third-party tools that make it easier to manage multiple WordPress sites from one dashboard. For example, InfiniteWP can help users maintain many different websites without switching back and forth between them all the time.
So who would need a multisite network?
It is recommended to use WordPress Multisite option if you qualify for one of the following cases:
- A network of websites or blogs for the company
- A network of websites managed by an agency or developer
- A SaaS (software as a service) that requires a site network for distribution
A specific example would be a magazine website with different sections managed by different teams that could implement WordPress Multisite to create their individual sites. A business might use multisite for sub-sites of its locations and branches as well, while government websites can manage multiple departments via the multisite feature.
Schools and colleges also utilize this technology to allow students access to creating blogs on school servers easily. All these scenarios highlight examples that would benefit from using WordPress Multisite (WPMS).
What You Need to Get Started with WordPress Multisite
If you already own a WordPress website, then you probably already have everything you need to get started with a multisite. To be absolutely sure, here are the things you need:
- Hosting: The first thing you should do before beginning to build a multisite network ensures that the server hosting your website can handle it. Shared web hosts might not be best for this type of site because they're usually resource-heavy and will take up memory on any individual domain. So, it's highly recommended starting out by using WordPress hosting providers who are experienced in supporting networks such as Cloudways, Kinsta, WP Engine, or A2 Hosting.
- Expertise: To add a new post, edit the files or make any other changes, you'll need to be familiar with WordPress's code.
- Access: You’ll need to edit some WordPress files, so access is required. You can either use the FTP or cPanel methods to upload your changes onto our server from your home computer without any issue whatsoever!
One more thing to consider when activating multisite is whether you want a subdomain or subdirectory for your website, and this will mostly depend on the type of installation.
Choose Your Domain Structure
First, let's find out what a domain name is. A Domain Name System (DNS) is the naming system for assigning name addresses to web servers, and web pages, on the internet. For example google.com or visualcomposer.com.
A subdomain is a domain that is part of the larger domain. For example news.google.com or my.visualcomposer.com.
A subdirectory is any folder that exists beneath a domain. For example google.com/maps/ or visualcomposer.com/features/.
How to install WordPress Multisite
To set up WordPress Multisite you will need to follow these steps:
- Install WordPress on your web server. Read a detailed tutorial on how to install WordPress.
- Open a wp-config.php file and allocate the very last line:
/* That’s all, stop editing! Happy blogging. */
- Just above this line, add the following code:
define( ‘WP_ALLOW_MULTISITE’, true );
- Don’t forget to save your wp-config.php file
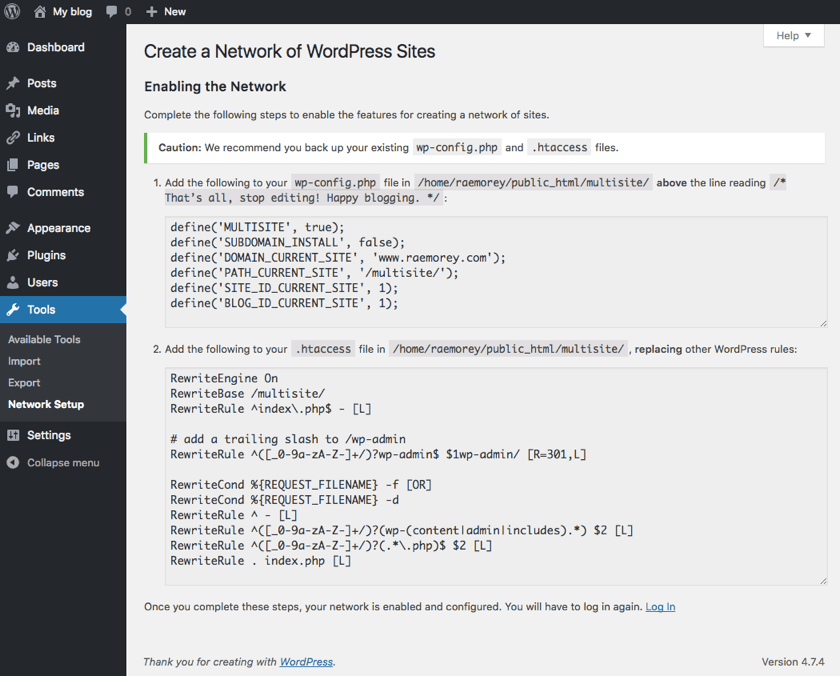
- Open the WordPress admin panel to install a Multisite network. Go to Tools – Network Setup and select either to use subdomains or directories
- Select a title and e-mail address for your network (or leave them as default)
- Click the Install button
- Modify wp-config.php and .htaccess files (WordPress will display the exact lines of code that needs to be adjusted)

Ending Note
WordPress Multisite is a powerful tool that can help you manage multiple websites with ease. Being in charge of multiple WordPress sites may seem like too much work, but using this tool will make your life easier by streamlining many management tasks from one dashboard.

Thank you for your great effort, appreciated.